What did you do to your Bronco Raptor today?

Big improvement on the bumper paint. what did you use?
Rustoleum truck bed liner from Lowe’s. My tape job wasn’t the best. So it need a little touchup. But for now I’m happy with it.
 
Installed the Desert Does It front under seat molle panel and adjustable angle bracket.
IMG_7820.webp
IMG_7826.webp
 
A little expensive for what it is but it'll serve my needs well and most importantly no new holes in interior panels.
 
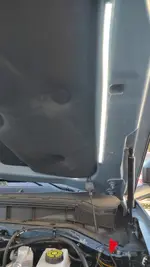
After seeing some posts on engine bay lighting I installed the TEQ Off-road under hood lighting today. I’m amazed that the “generic” version (TEQ is a Yoda shop) fits perfectly.

It’s not the cheapest option ( compared to Amazon 12” strip kits), but it’s currently $55 instead of the suggested $115 price from TEQ.

It comes with a 40” LED strip that provides plenty of light, shielded cable harness, inline fuse, a negative switched plunger and override button switch. Also includes plenty of cable management bits to tidy up the install. The finer points, the amount of light it throws and the perfect fit make it good value IMO.

I centered the strip on the hood in the only logical place it will go. It adhered nicely, but I had to leave a couple of gaps to conform to the under hood contours. I popped a two of the big plug clips using a panel tool on the insulation and routed the cable under the installation. The clips took a little coaxing to get out but went back in firmly.

Routed the wiring “harness” along some existing cables on the drivers side. The positive connected to the battery with just the right amount of slack, nothing extra.

I chose to drill a hole in the battery hold down bracket to mount the plunger switch. And again just the right amount of cable to be able to reasonably attach the spade connection, but nothing more. I mounted the switch to the inside of the fender well using the provided doubled sided tape. Used a few of their cable ties to secure everything, but there really wasn’t any excess cable flopping around.

Took a couple tries to get the plunger set to the right height, but it was easy enough with a couple 12mm wrenches.

Overall install was about 30 minutes taking my time to make sure the harness routed nicely.

Lights up well and evenly.
IMG_7607.webp


You can see the override button switch on the fender behind ground and the plunger switch mount here.
IMG_7606.webp


Cable exiting the hood insulation
IMG_7604.webp


Cable entering hood insulation and the light strip.
IMG_7603.webp
 
After seeing some posts on engine bay lighting I installed the TEQ Off-road under hood lighting today. I’m amazed that the “generic” version (TEQ is a Yoda shop) fits perfectly.

It’s not the cheapest option ( compared to Amazon 12” strip kits), but it’s currently $55 instead of the suggested $115 price from TEQ.

It comes with a 40” LED strip that provides plenty of light, shielded cable harness, inline fuse, a negative switched plunger and override button switch. Also includes plenty of cable management bits to tidy up the install. The finer points, the amount of light it throws and the perfect fit make it good value IMO.

I centered the strip on the hood in the only logical place it will go. It adhered nicely, but I had to leave a couple of gaps to conform to the under hood contours. I popped a two of the big plug clips using a panel tool on the insulation and routed the cable under the installation. The clips took a little coaxing to get out but went back in firmly.

Routed the wiring “harness” along some existing cables on the drivers side. The positive connected to the battery with just the right amount of slack, nothing extra.

I chose to drill a hole in the battery hold down bracket to mount the plunger switch. And again just the right amount of cable to be able to reasonably attach the spade connection, but nothing more. I mounted the switch to the inside of the fender well using the provided doubled sided tape. Used a few of their cable ties to secure everything, but there really wasn’t any excess cable flopping around.

Took a couple tries to get the plunger set to the right height, but it was easy enough with a couple 12mm wrenches.

Overall install was about 30 minutes taking my time to make sure the harness routed nicely.

Lights up well and evenly.
View attachment 15462

You can see the override button switch on the fender behind ground and the plunger switch mount here.
View attachment 15463

Cable exiting the hood insulation
View attachment 15464

Cable entering hood insulation and the light strip.
View attachment 15465
Seems like a reasonably priced (at $55) and well thought out kit. I'm not sure I would ever need this on the Raptor- I just don't need to go under the hood... but I may buy one for my '75 Bronco that has alot of gremlins!! Thanks for sharing!
 
I typically spend a lot of time under hood on all my vehicles. I'd sorta forgotten I'd installed the LED light and popped the hood last night to get battery info (will be doing an Antigravity lightweight lithium soon, should remove about 40lbs from the nose).

It was a very nice surprise when the LED's lit up the entire engine bay and made it super easy to see everything I needed, hands free. And the quality of light is also quite good.
 
I'd like to do the same, but use a switch mounted in the engine bay. Any suggestions on where I can find the light strip by itself?
 
You can do that with the Yoda kit. Just hook the negative to ground instead of to the hood switch and use the included switch to turn the light on and off.
 
I'd like to do the same, but use a switch mounted in the engine bay. Any suggestions on where I can find the light strip by itself?
As @Ape Factory said, it includes a manual switch. I’ll probably use the manual switch most of the time, but I decided to install the plunger switch as well to have the option.
 
Got the JCR side racks in and as is usual with JCR, they didn't send all the hardware. Out of all the products I've ordered, they've gotten it right 1/3 of the time and missing stuff 2/3 of the time. Sweet business model.

Anyway...had a bunch of Rotopax stuff already here, two 4-gallon gas tanks along with their new super sweet ODG 5-gallon water container, a couple of low budget traction boards in ODG as well, so I decided to get it all mounted up despite the missing hardware.

Not super hard to install but again, fidgety. Got it all buttoned up and took it out for a spin. Can't see the gas tanks in the rearview but the water jug is visible (had it on the driver's side). I'll have to wait for all of the hardware before I can test with the canisters full. But pretty slick overall. I did go with non-locking mounts and plan on designing something relatively simple for the gas canisters.

I believe my new top is arriving next week so I'll have to take all this off and put it back on again. Good times.

IMG_7835.webp
 
Were you happy with mounting the 40” strip? The hood contour is kind of irregular.
There were two spots where the hood had rather abrupt contour changes and the strip wasn't flexible enough to maintain 100% contact, so it passed over the area and had an air gap about the diameter of a number 2 pencil. I filled each void with RTV so there was a continuous bond throughout the entire length of the strip. My confidence level is high that the light will remain in place for years to come.
 
Added the Rockworkx Code Orange Hardtop Thumb screws. Thank you to @B4rk3r for his post and photos, which brought to my attention the Code Orange was now available. A few weeks ago they were listed as limited edition Code Orange, now they appear as just another color offering.

Somewhat close color match to the CO paint. As seen in @B4rk3r photo they are closer to the CO seat belts.
IMG_9141.webp

The front 2 have a washer/spacer to allow clearance for the hardtop reinforcement rib.
IMG_9144.webp


On mine, the OEM torx head bolts were barely snug, so I likewise just barely snugged these. Note the even gap along the black hardtop flange and Orange top of fender flange. These also provide something to clip to in the cargo area.
IMG_9157.webp
 
Huh, I have a set in red and no spacer for the front two so they end up interfering a bit with that bolt. Will need to get a thick washer or something I guess. I do find the bolts are needlessly long. You could hack 1/3 the length off and they'd be perfect.

I hand tighten them and find that even if I don't crank them down, the rear doesn't make any noise. Good product and so much easier than pulling out the ratchet and bit to remove the OEM bolts.
The front two Rockworkx spacers are machined parts, however seems a couple washers may also work. May be worth a phone call to Rockworkx to see if possible to obtain 2 of these spacers for your existing Rockworkx thumb screws.

Below is the Rockworkx black spacer measurements taken with dial calipers.
O.D. = .985 inch
I.D. = .312 inch (near press fit on the thumb screw threads and remains on the Thumb screw when removed)
Thickness = .158 inch, this should be considered minimal thickness as it seems the raised rib and the flange both come in contact when tightening Rockworkx thumb screw. Seems .170 - .200 would provide a little more clearance to the rib yet leaving plenty of threads.
 
I'll take a look at this once the new top is on. Arrived last week, just need to get it to the dealer to have them make the swap.
 
There were two spots where the hood had rather abrupt contour changes and the strip wasn't flexible enough to maintain 100% contact, so it passed over the area and had an air gap about the diameter of a number 2 pencil. I filled each void with RTV so there was a continuous bond throughout the entire length of the strip. My confidence level is high that the light will remain in place for years to come.
I ended up living with the air gap as well. It’s not going anywhere. But after 400 miles off-road traversing Death Valley the plunger switch worked itself loose. I cut it off and am relying on the manual switch now. One less thing to worry about
 
After seeing some posts on engine bay lighting I installed the TEQ Off-road under hood lighting today. I’m amazed that the “generic” version (TEQ is a Yoda shop) fits perfectly.

It’s not the cheapest option ( compared to Amazon 12” strip kits), but it’s currently $55 instead of the suggested $115 price from TEQ.

It comes with a 40” LED strip that provides plenty of light, shielded cable harness, inline fuse, a negative switched plunger and override button switch. Also includes plenty of cable management bits to tidy up the install. The finer points, the amount of light it throws and the perfect fit make it good value IMO.

I centered the strip on the hood in the only logical place it will go. It adhered nicely, but I had to leave a couple of gaps to conform to the under hood contours. I popped a two of the big plug clips using a panel tool on the insulation and routed the cable under the installation. The clips took a little coaxing to get out but went back in firmly.

Routed the wiring “harness” along some existing cables on the drivers side. The positive connected to the battery with just the right amount of slack, nothing extra.

I chose to drill a hole in the battery hold down bracket to mount the plunger switch. And again just the right amount of cable to be able to reasonably attach the spade connection, but nothing more. I mounted the switch to the inside of the fender well using the provided doubled sided tape. Used a few of their cable ties to secure everything, but there really wasn’t any excess cable flopping around.

Took a couple tries to get the plunger set to the right height, but it was easy enough with a couple 12mm wrenches.

Overall install was about 30 minutes taking my time to make sure the harness routed nicely.

Lights up well and evenly.
View attachment 15462

You can see the override button switch on the fender behind ground and the plunger switch mount here.
View attachment 15463

Cable exiting the hood insulation
View attachment 15464

Cable entering hood insulation and the light strip.
View attachment 15465
Regarding the engine bay lighting, I used the generic F150LED.COM kit. I ran it up the sides of the hood instead of top and bottom and it works great. I hooked it up to a switch that is under the hood (shown at bottom of picture in red) which works perfect for me. The other side of the hood is the same.
 

Attachments

  • Right side showing wiring and switch.webp
    Right side showing wiring and switch.webp
    92.7 KB · Views: 10
Regarding the engine bay lighting, I used the generic F150LED.COM kit. I ran it up the sides of the hood instead of top and bottom and it works great. I hooked it up to a switch that is under the hood (shown at bottom of picture in red) which works perfect for me. The other side of the hood is the same.
Welcome to BroncoRaptor.com! 🍻 I like your unique install location. Any after dark photo's of the engine bay?
 
Back
Top Bottom