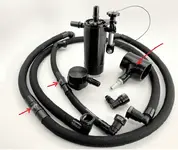
UPR Braptor Catch Can Development! Let’s GOOOOO!

Installed the single valve Catch can today. Couple of things to make it easier. Remove the battery hold down bracket (10mm &13mm). This allows you to move the battery back a bit giving you more room to work on the mount. The mount goes in the middle lower hole too.

On the factory clips just press the tab, a screwdriver works, just enough to release to clip. Not much force is needed so go easy. The factory tube pops right off.

Make sure to orient the tubes to the correct location and get a positive click for each one and make sure everything is tight and you're done.
UPR  #1.jpeg
UPR #2.jpeg
 
Installed the UPR single valve oil catch can, and after trying numerous hose routings, fittings, and orientation I decided to share my findings. The UPR recommended Catch Can location and mounting hole offers the best clearance and serviceability. I did however, need to remove the 4 silver set screws in the top that hold the catch can to the bracket and rotate the can so that the outlet was close to the battery. This orientation keeps the hoses somewhat parallel, tucked lower, and maintains the factory clearance to the hood insulation. This routing also prevents the catch can hoses from contacting the air intake tubing to avoid the possiblity of transferring increased temps to the intake tubing. When I routed the hoses over the top of the air intake tubes it left minimal clearance to the bottom of the hood insulation pad. I also purchased 2 additional 5/8" x 90 degree quick release fittings H5032-88 from UPR for ease of hose routing replacing the 2 45 degree fittings that came on the hoses in my kit. Note that you can twist the hoses once installed to assist them in naturally laying in the desired position. Since the inlet hose was near the fan shroud I added a 1" wire loom clip retainer into the existing 1/4" hole in the shroud, this provides a little additional support to the hose and catch can. This routing does have the intake hose over the oil filter cap, it's still possible to remove the oil filter with the hose in place, however it's easy to unclip the intake hose moving it out of the way and serves as a reminder to also empty the catch can.

E4CCAE75-F4E3-49A0-99A5-9BC955E11296.jpeg


01395D62-66B7-41E2-A4D2-F282CF47200A.jpeg


5A43BE65-0F38-4DF6-8F1C-7D6D876D4175.jpeg


F6893527-C979-4B9A-BF57-68E400F0010A.jpeg
 
@LethalJoe,
I have the UPR drain plug … genius! Ford needs to put these on all their engines. Now I'm looking to buy an oil catch can after researching GTDI engines. Best detail:

A lot of debate on the internet whether you need one or not. “After updating the 2.7L EcoBoost to include direct injection and a port injection, Ford no longer recommends a catch can for anything newer than 2018.” Well, that doesn’t fly for the 3.0L EcoBoost GTDI engines in the Lincoln MKZ, Continental and Aviator and the Ford Explorer and Bronco Raptor. The latter being of most interest for me and I've decide yes. Your previous post about dual (cylinder head vent and positive crankcase ventilation) vs. single (cylinder head vent only) and the above video makes me want to go with the dual; especially for when the turbos are spun up, which is where you get the most blow-by.

OK, back to Lethal Performance ....
What is the difference between the Bronco catch cans 5030-284-1-CSS (3.0L) and the 5030-277-1-CSS (2.7L)? Does the 5030-284-1-CSS kit come with a UPR intake coupler like the 5030-277-1-CSS kit? See photo below. If not, why?

Why would I upgrade to the UPR Pro Series™ Billet Check Valve at $50 each? Doesn’t the standard UPR Billet Check Valve at $40 each (which comes with the -284- kit) do the job? See photo below. Shouldn't the upgrade just be the difference in cost, i.e. $10 each? Something seems to be messed up with the ordering website. [Edit: just saw your YouTube video with Steve from UPR about the Pro Series™ check valve serviceability. (y)] Still interested in the cost question. I understand the cost if purchasing separately down the road, but during the build process you're swapping out like for like so how is that a full cost upgrade?

Do you plan to have a sale for President’s day or Moab Easter Safari? I was hoping to see something at the Winter Jamboree in Hurricane, UT.

Seriously want to buy, but need to understand what I am buying.

UPR catch can kit.png
 
Last edited:
Installed the UPR single valve oil catch can, and after trying numerous hose routings, fittings, and orientation I decided to share my findings. The UPR recommended Catch Can location and mounting hole offers the best clearance and serviceability. I did however, need to remove the 4 silver set screws in the top that hold the catch can to the bracket and rotate the can so that the outlet was close to the battery. This orientation keeps the hoses somewhat parallel, tucked lower, and maintains the factory clearance to the hood insulation. This routing also prevents the catch can hoses from contacting the air intake tubing to avoid the possiblity of transferring increased temps to the intake tubing. When I routed the hoses over the top of the air intake tubes it left minimal clearance to the bottom of the hood insulation pad. I also purchased 2 additional 5/8" x 90 degree quick release fittings H5032-88 from UPR for ease of hose routing replacing the 2 45 degree fittings that came on the hoses in my kit. Note that you can twist the hoses once installed to assist them in naturally laying in the desired position. Since the inlet hose was near the fan shroud I added a 1" wire loom clip retainer into the existing 1/4" hole in the shroud, this provides a little additional support to the hose and catch can. This routing does have the intake hose over the oil filter cap, it's still possible to remove the oil filter with the hose in place, however it's easy to unclip the intake hose moving it out of the way and serves as a reminder to also empty the catch can.
Boy Howdy, it looks like it was meant to be there. A real professional install.

You see any future issues with draining the can? The neighborhood looks crowded. Are there any options for mounting on the firewall or passenger wheel well?
 
Boy Howdy, it looks like it was meant to be there. A real professional install.

You see any future issues with draining the can? The neighborhood looks crowded. Are there any options for mounting on the firewall or passenger wheel well?
Serviceability is quite easy, the hose fittings are quick disconnects by simply depressing a tab on the fitting as you pull upward. Then remove the can from the mounting bracket by simply unscrewing the tethered thumb screw and the Catch Can will pull straight upward and out of the engine bay to empty, no tools needed. UPR made it very easy for us.
 
Last edited:
@TurboS did you buy any of the additional upgrades for your catch can? I'm not sure which ones I need if any???

Screenshot 2023-01-24 at 6.56.16 AM.png
 
@TurboS did you buy any of the additional upgrades for your catch can? I'm not sure which ones I need if any???

View attachment 5564
I did not initially as I didn't want to add the additional components of the drain line kit, since access and emptying with the Bronco Raptor install is so easy and clean. I will be ordering the Extra Replacement O-Rings as spares for future replacement. Not sure if the SS Magnetic Drain Plug is of any value yet but I will likely add to the cart anyways for additional safety measures.
 
  • Thread Starter
  • Thread starter
  • #28
Follow up video for this is being edited now. We put several thousand miles on our Bronco Raptor since the UPR dual valve catch can install as well as installed the JB4 tuner. My main point of doing this is that I often see people reply to threads about catch cans saying they're worthless and don't do anything or capture any oil. Well, wait till you see how well the UPR can works.

Stay tuned!
 
Installed the UPR single valve oil catch can, and after trying numerous hose routings, fittings, and orientation I decided to share my findings. The UPR recommended Catch Can location and mounting hole offers the best clearance and serviceability. I did however, need to remove the 4 silver set screws in the top that hold the catch can to the bracket and rotate the can so that the outlet was close to the battery. This orientation keeps the hoses somewhat parallel, tucked lower, and maintains the factory clearance to the hood insulation. This routing also prevents the catch can hoses from contacting the air intake tubing to avoid the possiblity of transferring increased temps to the intake tubing. When I routed the hoses over the top of the air intake tubes it left minimal clearance to the bottom of the hood insulation pad. I also purchased 2 additional 5/8" x 90 degree quick release fittings H5032-88 from UPR for ease of hose routing replacing the 2 45 degree fittings that came on the hoses in my kit. Note that you can twist the hoses once installed to assist them in naturally laying in the desired position. Since the inlet hose was near the fan shroud I added a 1" wire loom clip retainer into the existing 1/4" hole in the shroud, this provides a little additional support to the hose and catch can. This routing does have the intake hose over the oil filter cap, it's still possible to remove the oil filter with the hose in place, however it's easy to unclip the intake hose moving it out of the way and serves as a reminder to also empty the catch can.

View attachment 5486

View attachment 5487

View attachment 5488

View attachment 5489
Just completed my installation following your instructions/pictures...very helpful. Thank you!
 
Received my UPR dual valve system yesterday. Now I just need a BRaptor.

69864.gif
 
Installed the UPR single valve oil catch can, and after trying numerous hose routings, fittings, and orientation I decided to share my findings. The UPR recommended Catch Can location and mounting hole offers the best clearance and serviceability. I did however, need to remove the 4 silver set screws in the top that hold the catch can to the bracket and rotate the can so that the outlet was close to the battery. This orientation keeps the hoses somewhat parallel, tucked lower, and maintains the factory clearance to the hood insulation. This routing also prevents the catch can hoses from contacting the air intake tubing to avoid the possiblity of transferring increased temps to the intake tubing. When I routed the hoses over the top of the air intake tubes it left minimal clearance to the bottom of the hood insulation pad. I also purchased 2 additional 5/8" x 90 degree quick release fittings H5032-88 from UPR for ease of hose routing replacing the 2 45 degree fittings that came on the hoses in my kit. Note that you can twist the hoses once installed to assist them in naturally laying in the desired position. Since the inlet hose was near the fan shroud I added a 1" wire loom clip retainer into the existing 1/4" hole in the shroud, this provides a little additional support to the hose and catch can. This routing does have the intake hose over the oil filter cap, it's still possible to remove the oil filter with the hose in place, however it's easy to unclip the intake hose moving it out of the way and serves as a reminder to also empty the catch can.

View attachment 5486

View attachment 5487

View attachment 5488

View attachment 5489
I love this set up and want to replicate it on mine. I plan on order the same fitting my question is do the ends just pull off so I can put new 90° end on? They aren't crimped on are they?
 
I love this set up and want to replicate it on mine. I plan on order the same fitting my question is do the ends just pull off so I can put new 90° end on? They aren't crimped on are they?
They're easily removed by twisting and pulling.
 
I am close to ordering one of these.

UPR Plug N Play Dual Valve Oil Catch Can w/Clean Side Separator (2022 Bronco Raptor 3.0L) - 5030-284-1-CSS​

https://www.lethalperformance.com/u...r-2022-bronco-raptor-3-0l-5030-284-1-css.html

How was the install?, any chance there is some Video out there (I looked on YouTube),Thanks for any input.

Hey there!

The installation was done at UPR during their research and development with the BRaptor, and unfortunately I do not have any video of that exact install. However, I do have the install guide, which does go over the process much better.


While there are a few extra steps to the install, particularly the more "extensive" steps, however, I would certainly not consider any of the steps harder, just required more tools and will add an hour to the install. Down the road another 50-100k miles later, that effort will not have gone to waste.

If you plan on driving this thing hard, I would certainly recommend the Dual Valve and pushing through on the install. The fact of the matter is, everything that catch can collects is not going to get caked up on your valves, intake, intercooler, charge pipes, etc... Even after 10-20k miles, it's amazing what that can will catch!
 
Joe; Thanks for the information and taking time time to respond . I am closer to ordering after my Taxes :confused:

Will you be at The Bronco Super Celebration Townsend – Tennessee ?
 

Top Member Reactions

Back
Top