What did you do to your Bronco Raptor today?

  • Thread Starter
  • Thread starter
  • #901
Anyone have specs on the rounded bolts that attach the license plate to the skid plate? I have a similar setup but the bolts are too short.
Any chance you could have used the bolts meant to mount the license plate for the bracket mounting? I think there were two different-length bolts in my kit. I can check here in a bit.
 
curious, I'm not sure. I put that in storage! If you do find that please let me know!!
 
It's been a while since this thread had something new and I'm way overdue for this project so why not get it done on a nice fall friday morning. Some time ago I posted my new Strands Siberia Qube Pod Light installation with the promise that more was to come.

I had initially ordered a curved Diode Dynamics 30" Light bar but wasn't really pleased with the fitment as the curvature of the bar was more aggressive than that of the bumper. It also meant that the bar would stick out in front of the bumper a good 2-3 inches, which I also wasn't very keen on. That fitment was a function of both the curvature and depth of the bar itself as well as the available mounting brackets. So I set my sights on finding the best combination of mounting solutions as well as lighting options that provided really good forward lighting while also being as flush as possible to the front of the bumper. What I came up with was a combination of brackets from 4x4TruckLEDs along with the Strands Siberia Single Row 32" Light Bar. I really like the amber light bar function from both the Pods and the Lightbar itself. Since the amber headlamp feature flickers when taking the photos you don't see in these pictures how well they work together but it creates a really good appearance. I looked at other options that provide a similar backlit 'bar' look but I wanted better overall driving light performance and not a fan of the "dotted-line" look that you see with a competitive product.

View attachment 10848

View attachment 10849

I'll need to get more pictures after dark to get a better idea of their performance but for now I'm quite pleased with them. Here's a general overview of the install as it's pretty straightforward, going to focus more on the specific bracket/light setup rather than the install itself. The reality is that getting the brackets as I wanted them was the most difficult part of the process, followed by fishing the cable extension through the engine bay.

Brackets:
As mentioned I really wanted something to sit as flush as possible to the front of the bumper. Almost every mounting solution I found has the lights sitting well in front of the bumper, which makes sense as most lights are too deep to sit flush (including traditional round lights). I ended up purchasing the KR Offroad Brackets from 4x4TruckLEDs and cutting off a section then sanding and adding a few coats of matte black Rustoleum paint. I also added some 2-sided gorilla tape on the inside section to prevent scratches.

Brackets as-ordered:
View attachment 10850

Modified Brackets:
View attachment 10851

View attachment 10852

DT4 Extension:
As the wire harness from the light is only about 20in long and has a DT4 connector, I ordered the DT4 Extension Wire from DD in 3M to give me all of the length needed to run to the Upfitter wiring under the hood. It was a pretty straightforward run from the front bumper through the wheel well and up in front of the battery. From there I zip-tied along the fender edge with some other accessory wiring and cut to length, etc. The only trick for me was accessing the underside of the engine bay to run the harness up. I simply turned the wheels facing hard left/driver, undid a single clip to pull the fender liner back and got to work.

View attachment 10853

Light Installation:
From there is was pretty straightforward to install the mounts and get the light in place. The trick is that this light is ~32" wide and the brackets give at best 31" to work with. So when I had modified the brackets before I had to bend them every so slightly to make enough room for them to fit. For the light installation in put the brackets in place on the bumper first to ~80% tightness, then put the lightbar in place with each end bolt inserted ~50% just to get everything in place and lined up. From there I tightened each end of the bar gradually to maintain balance on both sides and finally tightened the Bumper Bolts as much as I could. I'll be going back and checking them periodically and might consider some blue locktite in the future.

Here you can see how flush it sits to the bumper and seems to be a pretty clean install. Additionally no blockage of the front camera and I didn't have to shove the wire harness behind the grille surround as the setup gave just enough room between the light and the surround to sit down snug.

View attachment 10854
View attachment 10855
View attachment 10856

@DallasCajun , did the bracket make the light bar sit too far forward and interfere with the camera? My brackets came in yesterday and my lightbar comes in on Thursday and wanted to make sure it wasn't going to interfere.

TIA
Crazy
 
@DallasCajun , did the bracket make the light bar sit too far forward and interfere with the camera? My brackets came in yesterday and my lightbar comes in on Thursday and wanted to make sure it wasn't going to interfere.

TIA
Crazy

My modifications to the brackets brought the front of the bar to sit flush with the front of the bumper. That along with the minimal height of the bar minimizes the impact of the view...but there is a small portion of the view that’s blocked.

Here’s a picture which I placed a small screwdriver on top of the light as a reference. You can clearly see the bar across the screen but since it’s sitting back it’s very minimal.

IMG_5483.jpeg


The gray section you see at the base of the tool is the bottom cross-section of the front grille.
 
My modifications to the brackets brought the front of the bar to sit flush with the front of the bumper. That along with the minimal height of the bar minimizes the impact of the view...but there is a small portion of the view that’s blocked.

Here’s a picture which I placed a small screwdriver on top of the light as a reference. You can clearly see the bar across the screen but since it’s sitting back it’s very minimal.

View attachment 11587

The gray section you see at the base of the tool is the bottom cross-section of the front grille.
Thanks for the heads up. I will see how mine looks with the camera and see if I need to modify the bracket also. I will be doing all this before the wiring so I don't have to redo everything. Thanks again.
 
  • Thread Starter
  • Thread starter
  • #906
curious, I'm not sure. I put that in storage! If you do find that please let me know!!
They are definitely different bolts on my kit.

IMG_0544.jpeg
 
  • Thread Starter
  • Thread starter
  • #909
Whoa, @RoBear sending it! We need details! :)🍿
 
wasnt this ChiliPepper sending it? same person?
 
Yep,  not my finest moment. 😬

On the first and second attempts, I was using the 1-pedal feature to govern the speed, but I could not get up the double step. Catching on the trailing arm forward bracket. The spotter said "you're going to have to bump it". So I released the 1-pedal and gave it some gas. Caught a little air on the 3rd step. No harm, no foul. A lesser rig would have sustained some damage.
80610.jpeg
 
 
nice-rack.png

this week's project was trailrack+ski racks. zombie chainsaw mount is backordered. until then i'm gonna bolt a stepladder to the rack so i can get to the skis.
 
I've got the Kuat Grip racks that I use on my Defender’s rack too. The slide out functionality on the tray works great for loading and unloading the skis on tall vehicles. Right until you need to close the racks. The rack handle when open is too high on the Defender to reach easily at 6’2”. Since I’m always the driver, at least I’ve got my ski boots off and just grab the rack snd stand on the tire.

Love the Trail Rax rack, I’ll probably get one on the Raptor soon.

And finally some decent amounts of snow this week.
 
i'm not quite that tall, so it'll be me climbing up onto the rear tire to get that stuff stowed. i toyed with the idea of getting some additional t-slot and making a mount for the pakrax, but it doesn't do much to improve the handle position. these are the grip 4s, and if i have to scale to the 6s the side-mount solution would be 100% unworkable.

at any rate, my daughter's ski lesson is tomorrow morning, and while i'd like some fresh snow i'll settle for it not to be pouring rain like last saturday. it comes with the territory so it's lame to complain about it, but it does somewhat diminish the experience.

1706895042739.png
 
Dropped mine off at the facility to get hand controls installed. Bought the dang thing in October and finally getting them installed. Will be picking up my valentines date(the braptor) on Wednesday and be able to drive it after just looking out the window at it.

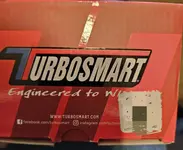
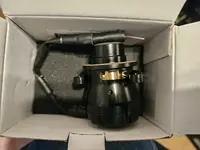
Plus got my Turbosmart blow off valve in today while gone. Anyone have any insight on how to keep the o-rings in place for install?

20240212_142106.jpg20240212_144709.jpg

Pics for attention.
 
Dropped mine off at the facility to get hand controls installed. Bought the dang thing in October and finally getting them installed. Will be picking up my valentines date(the braptor) on Wednesday and be able to drive it after just looking out the window at it.

Plus got my Turbosmart blow off valve in today while gone. Anyone have any insight on how to keep the o-rings in place for install?

View attachment 11698View attachment 11699

Pics for attention.
I don't recall having a problem with my O rings I used a T handle for the bolts.
T Handle
 

Attachments

  • processed-932ad571-f7c3-431e-bb3f-3addaff86052_kPbfporR.jpeg
    processed-932ad571-f7c3-431e-bb3f-3addaff86052_kPbfporR.jpeg
    357 KB · Views: 21

Top Member Reactions

Back
Top