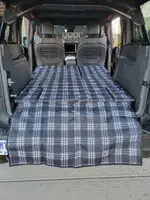
What did you do to your Bronco Raptor today?

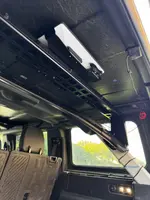
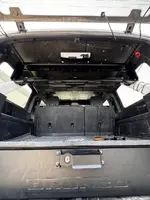
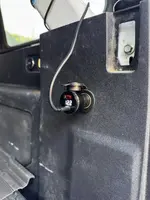
Not directly related, but I did install one of my Starlink Mini kits on another Braptor today :D

-Quick-Release Starlink Mini mount
-Bronco Crossbar kit with molle panel
-6.5 ft Starlink USB-C cable
-120W PD USB-C car charger
 

Attachments

  • IMG_0754.JPG
    IMG_0754.JPG
    177.3 KB · Views: 37
  • IMG_0735.JPG
    IMG_0735.JPG
    193.1 KB · Views: 42
  • IMG_0768.JPG
    IMG_0768.JPG
    235.3 KB · Views: 38
Not directly related, but I did install one of my Starlink Mini kits on another Braptor today :D

-Quick-Release Starlink Mini mount
-Bronco Crossbar kit with molle panel
-6.5 ft Starlink USB-C cable
-120W PD USB-C car charger
Hey Chief, that is SWEET looking! I expect I’ll be ordering one very soon!

BTW, what Starlink plan are you running currently?
 
Not directly related, but I did install one of my Starlink Mini kits on another Braptor today :D

-Quick-Release Starlink Mini mount
-Bronco Crossbar kit with molle panel
-6.5 ft Starlink USB-C cable
-120W PD USB-C car charger
I love this design. Safe to assume if you have a rack installed, you’re likely to be impeding the dish’s ability to communicate to the satellites some, right?
 
I am looking for some feedback on the below baja bar and whether anyone has installed on their BR. The vendor and folks who have bought and installed it have uploaded pics but they are not at right angle to determine whether it will block the front cam. I kinda think it won't but am looking for confirmation. Has anyone installed this bar and if so, can you confirm that it does not block the front cam or mess with the 360 view? A pick of what you see on your center screen would be most appreciated.

1728608036371.png
 
Just finished my ARB Twin Compressor install. The install was easy after installing the ADD rear molle panels, but the wiring…..

Running the twin 10 gauge power supply lines from the bit more of a challenge. I cut up my original harness, so I could easily butt connect in the engine bay near the firewall grommet. Ground point right under the carb trim panel, was super convenient and super close to the compressor. The compressor end of the harness fed nicely in the panel, but I decided to leave the plug exposed for later convenience.

The part in the middle was a pain! I pulled 10 big and small interior trim panels from the drivers footwell to 2/3 of the cargo area running the supply wiring through the cable tray. Took a long time to get it all out without breakage, but snapped back in pretty quick and easy.

Decided to do this vs more weight on tail gate, access issues with loaded truck with DV8 tray etc. Everything is a compromise of some sort including this solution.

FWIW
IMG_5094.jpeg
IMG_5093.jpeg
IMG_5084.jpeg
IMG_5085.jpeg
 
Just finished my ARB Twin Compressor install. The install was easy after installing the ADD rear molle panels, but the wiring…..

Running the twin 10 gauge power supply lines from the bit more of a challenge. I cut up my original harness, so I could easily butt connect in the engine bay near the firewall grommet. Ground point right under the carb trim panel, was super convenient and super close to the compressor. The compressor end of the harness fed nicely in the panel, but I decided to leave the plug exposed for later convenience.

The part in the middle was a pain! I pulled 10 big and small interior trim panels from the drivers footwell to 2/3 of the cargo area running the supply wiring through the cable tray. Took a long time to get it all out without breakage, but snapped back in pretty quick and easy.

Decided to do this vs more weight on tail gate, access issues with loaded truck with DV8 tray etc. Everything is a compromise of some sort including this solution.

FWIW
View attachment 13831View attachment 13832View attachment 13833View attachment 13834
Looks great, fantastic idea. How loud is the compressor inside ?
 
Looks great, fantastic idea. How loud is the compressor inside ?
Loud enough that I wouldn’t want to sit in the backseat when it’s running. But I don’t take a lot of folks with me when I’m on the trail, you only run it when the ride is over and usually everyone’s standing around while airing up anyway. I didn’t consider interior noise to be a big negative for me.
 
does anyone know what this harness and “device” (circled in pics) is for? This is drivers rear cargo trim panel. I forgot to check it out while doing my project. I was mostly surprised there was a harness to detach back there and then the need to make sure I plugged it back in before sealing it up (I did!). It would be like me to forget.

And we need a thread that shows the back of any panel pulled off so we can see what clips and harnesses are back there. So much easier to pull without breaking when you know what you’re dealing with!
IMG_5087.jpeg
IMG_5086.jpeg
 
does anyone know what this harness and “device” (circled in pics) is for? This is drivers rear cargo trim panel. I forgot to check it out while doing my project. I was mostly surprised there was a harness to detach back there and then the need to make sure I plugged it back in before sealing it up (I did!). It would be like me to forget.

And we need a thread that shows the back of any panel pulled off so we can see what clips and harnesses are back there. So much easier to pull without breaking when you know what you’re dealing with!
View attachment 13839View attachment 13840
It seems I saw this in a YouTube video and they stated it was an antenna, maybe for the keyless entry.
 
Last edited:
It Has worked out well, for a full-size flag or a whip flag attachment area also.
I have used it twice while off road and its sturdy!
 
A small visual enhancement: installed Code Orange TufSkinz dash lettering over out OEM orange letters. On mine the OEM code orange letters appeared slightly faded, a good idea but poor execution. I looked at the decal overlays but decided on these TufSkinz letters as they are licensed by Ford and an approved vendor as you're able to purchase exterior and interior TufSkinz products directly from Ford. The TufSkinz letters fit perfect and sized slightly larger than the OEM orange leaving no trace of the original orange underneath.

Installation Hint, use tweezers to assist in positioning and aligning letters, once in place they are difficult to align. After a couple days to assure full cure I will spray with this interior ceramic coating attempting to seal off any exposed sticky bonding tape edges to minimize possible dust/dirt collection at the base of the letters.

Before:
IMG_8484.jpeg


After:
IMG_8493.jpeg

IMG_8494.jpeg

IMG_8504.jpeg
 
Last edited:

Top Member Reactions

Back
Top