What did you do to your Bronco Raptor today?

Today I cleaned all the mud, dust and bugs off the inside and out of my truck. Sadly for everyone else, the Mojave desert is now a 3% smaller based on the amount of debris that was sitting in the street after power washing and cleaning inside and out.

great trip for the spring months while the trails are still sitting under a lot of snow and the temps are still cool. I did 4 nights in the Mojave, starting on Mojave Road just east of Barstow, through Afton Canton, hooning in Rasor open riding OHV dunes, across Soda Lake and then 200 more miles primarily on or around the East Mojave Historic Trail.

Most of the trails were pretty wide, but my favorite trail was a fast, tight flowing through cactus and other brush. Not a place for painted flares, for sure.

Easter weekend and only saw about 6 vehicles the first two days, then started seeing more in the more tourist accessible areas.
F907CD1C-03A9-4FB5-8071-77B6A36917E7.jpeg
FA5A36AD-17A2-47CF-9C4B-B3BC598265C5.jpeg
A49CD600-13EF-4F96-A610-05F3F9B802B4.jpeg
35DD6323-1815-4F3F-B6E0-7929867F919D.jpeg
664AD7A5-511F-43CD-A5A5-57F58B463E43.jpeg
FE79CB8D-4058-4E1A-BB06-B865DC6D62EF.jpeg
3D2609FC-5B91-481C-BE32-6C777D4AFDB8.jpeg
F4B9DBF1-A24E-4EDF-958F-31A3466E48E4.jpeg
A19761C7-D4A6-45CD-8062-B076B5F75239.jpeg
 
Looks like a fun trip... I have done a similar trip to that in my RZR cant wait to take the Bronco!
Any upgrades that you had or wish you had on the trip?
 
Looks like a fun trip... I have done a similar trip to that in my RZR cant wait to take the Bronco!
Any upgrades that you had or wish you had on the trip?
It was a great trip, the pictures don’t even begin to do justice to the fun driving.

uogrades? the one thing that I think needs to be addressed that is the culmination of two Raptor weak points (limited range and tailgate flex) is some way to carry more gas without stressing the tailgate.

I ended up with a small dent (actually two in the same place) from flex in the strap on rotopax carrier and/or the tire carrier In the upper tailgate where the Rotopax corner made contact. Probably occurred on one of a couple “less than smooth transitions” into or out of bumps at speed. A bummer, but totally worth it based on the smile meter.

’I knew my Rotopax carrier was a temporary measure, but I can’t decide on whether to get a roofrack (likely Trail Rax with Pax Rax) or a rear bumper with tire and roto mounts.

I don’t really want the rack as I (currently) plan to take the top off regularly in California despite all the utility a rack brings. But I’m afraid long term the tailgate will remain an issue so that may be a future upgrade.

but not sure anyone makes a Bronco Raptor tire carrier solution due to the 6x135 bolt pattern. Haven’t really looked much though.

Secondly, I might consider some ppf for my flares (body is already fully wrapped). I have quite a few small scratches on the passenger front flare (and mirror housing). I did a better job protecting the drivers side, but trail strikes were unavoidable at the speeds we were going. The rear flares benefit a lot from the “accessory ready” disposable rock strike inserts.
 
Pretty sweet setup John....anything that helps get a better sleep is worth it!
I really like the widow vent idea and most likely making my own set of them. Thanks for the show how...
After four nights sleeping in truck in the desert, my setup worked great! On one night a wind storm came up, blowing sand up under my buddies tent flies and then filtering down on them through the netting.

I didn’t even know there was any wind storm.

im a ultralight backpacker but usually sleep awful due to crinkly thin inflatable sleeping pad and no pillow. The Solomat with a real pillow was like sleeping at home. My cheap vents worked great. That really changed the game on comfort.

I also learned that I could pop the plug on the mattress when I woke up deflating the mattress slightly, then folding in half created enough space for everything to stay on one level in the back while travelling. So my set up and take down at camp was quick and easy. Note: the Solomat is self inflating, which is great for comfort and ease of setup, but compressing takes a fair amount of effort (And space) to roll tightly to store in its bag. Much easier to partially deflate, then compress it when you get home.

so if you’re looking for a reasonable camping solution for a few trips a year, I highly recommend the Solomat and DIY vents.
 
It was a great trip, the pictures don’t even begin to do justice to the fun driving.

uogrades? the one thing that I think needs to be addressed that is the culmination of two Raptor weak points (limited range and tailgate flex) is some way to carry more gas without stressing the tailgate.

I ended up with a small dent (actually two in the same place) from flex in the strap on rotopax carrier and/or the tire carrier In the upper tailgate where the Rotopax corner made contact. Probably occurred on one of a couple “less than smooth transitions” into or out of bumps at speed. A bummer, but totally worth it based on the smile meter.

’I knew my Rotopax carrier was a temporary measure, but I can’t decide on whether to get a roofrack (likely Trail Rax with Pax Rax) or a rear bumper with tire and roto mounts.

I don’t really want the rack as I (currently) plan to take the top off regularly in California despite all the utility a rack brings. But I’m afraid long term the tailgate will remain an issue so that may be a future upgrade.

but not sure anyone makes a Bronco Raptor tire carrier solution due to the 6x135 bolt pattern. Haven’t really looked much though.

Secondly, I might consider some ppf for my flares (body is already fully wrapped). I have quite a few small scratches on the passenger front flare (and mirror housing). I did a better job protecting the drivers side, but trail strikes were unavoidable at the speeds we were going. The rear flares benefit a lot from the “accessory ready” disposable rock strike inserts.
I installed the PakRax from TrailRax and think that might e the solution you need. Can carry up to 8 RotoPax (4 x double stacked - I have 4 x single stacked). Works with their rack, half rack (what I have) or stand alone w/o attaching to a rack.

Here is a link:
 
Today I cleaned all the mud, dust and bugs off the inside and out of my truck. Sadly for everyone else, the Mojave desert is now a 3% smaller based on the amount of debris that was sitting in the street after power washing and cleaning inside and out.

great trip for the spring months while the trails are still sitting under a lot of snow and the temps are still cool. I did 4 nights in the Mojave, starting on Mojave Road just east of Barstow, through Afton Canton, hooning in Rasor open riding OHV dunes, across Soda Lake and then 200 more miles primarily on or around the East Mojave Historic Trail.

Most of the trails were pretty wide, but my favorite trail was a fast, tight flowing through cactus and other brush. Not a place for painted flares, for sure.

Easter weekend and only saw about 6 vehicles the first two days, then started seeing more in the more tourist accessible areas.
View attachment 7423View attachment 7424View attachment 7425View attachment 7426View attachment 7427View attachment 7428View attachment 7429View attachment 7430View attachment 7431
Nice pix! Unusual to run the Mojave Road from west to east...most folks go the opposite direction (not sure why). Looks like you got to Kelso Dunes and the Granite Mtns as well (?). Love the Mojave! So much to explore there and the BRaptor is perfect for it.

Are there still any road closures from the floods over the past couple years? I know that portions of the Kelbaker Road were closed last spring...
Got to Kelso (fantastic!),Granite Mountains, Hole-in-the-Wall, Providence, Afton Canyon, Megaphone, Amboy Crater,Rasor OHV etc. but 90%of the time you’re just running or crawling through the desert. I only ran Mojave Road from outside Barstow to Kelbaker road, going east since I came in from North Central Valley. Then Jumped on EMHT segment 3 and wound around generally south and east until I did my final exit on I40.

Kelbaker was fully open as I understand it. I was only on it for a short bit, but traffic was clearly going through. The only closures I know of were, Cima road (paved) due to construction and the Mojave Road across the Soda Lake just south of Baker. I actually drove through that as it wasnt marked closed coming from the west (it was however barricaded (movable) at the east side). The lake bed was dry except for one water/mud crossing that was very doable, but would have eaten a Subaru. In any case, this was drying out fast and should be fully open shortly.
 
I installed the PakRax from TrailRax and think that might e the solution you need. Can carry up to 8 RotoPax (4 x double stacked - I have 4 x single stacked). Works with their rack, half rack (what I have) or stand alone w/o attaching to a rack.

Here is a link:
Yeah I like that solution a lot, but I want to take some time to decide if I like taking the top off more than I like the PaxRax utility. It would be nice to haul gas and water externally, plus facilitate an awning. It was already getting hot in the Mojave when I left

did you go with stand-alone pax Rax or do you have TRMR? Any thoughts on whichever way you went?
 
Last edited:
Yeah I like that solution a lot, but I want to take some time to decide if I like taking the top off more than I like the PaxRax utility. It would be nice to haul gas and water externally, plus facilitate an awning. It was already getting hot in the Mojave when I left

did you go with stand-alone pax Rax or do you have TRMR? Any thoughts on whichever way you went?
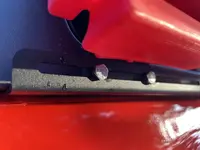
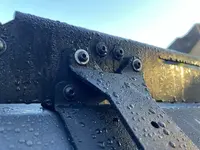
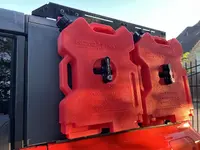
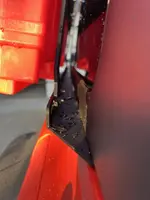
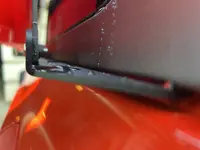
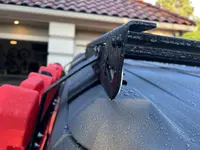
I have the half TRMR (only over the back part of the top) - as I’m getting the front Bestop over the front section. I will say that having the PakRax as a standalone, removal of the top would still be easy. You would remove 8 hex bolts from the bottom of the PakRax and then they would just come off with the rear hardtop section. The bottom brackets bolt on between the hardtop and vehicle and would not impact top removal (and aren’t too big and probably would not look bad). Same if you have the half TRMR (I’ll do this if I decide to go topless from time to time). I’ll go grab some pictures up close of all the mounting hardware and post them shortly…
 
  • Thread Starter
  • Thread starter
  • #370
It was a great trip, the pictures don’t even begin to do justice to the fun driving.

uogrades? the one thing that I think needs to be addressed that is the culmination of two Raptor weak points (limited range and tailgate flex) is some way to carry more gas without stressing the tailgate.

I ended up with a small dent (actually two in the same place) from flex in the strap on rotopax carrier and/or the tire carrier In the upper tailgate where the Rotopax corner made contact. Probably occurred on one of a couple “less than smooth transitions” into or out of bumps at speed. A bummer, but totally worth it based on the smile meter.

’I knew my Rotopax carrier was a temporary measure, but I can’t decide on whether to get a roofrack (likely Trail Rax with Pax Rax) or a rear bumper with tire and roto mounts.

I don’t really want the rack as I (currently) plan to take the top off regularly in California despite all the utility a rack brings. But I’m afraid long term the tailgate will remain an issue so that may be a future upgrade.

but not sure anyone makes a Bronco Raptor tire carrier solution due to the 6x135 bolt pattern. Haven’t really looked much though.

Secondly, I might consider some ppf for my flares (body is already fully wrapped). I have quite a few small scratches on the passenger front flare (and mirror housing). I did a better job protecting the drivers side, but trail strikes were unavoidable at the speeds we were going. The rear flares benefit a lot from the “accessory ready” disposable rock strike inserts.
I think the answer to the tailgate issues is going to be an aftermarket bumper with a tire carrier. Here is a couple that fit the standard Bronco that I found.


I spoke to Expedition 1, their current Bronco offering does not fit the Bronco Raptor. They are aware that many Bronco Raptor owners are interested, but don't plan to offer Bronco Raptor fitment until next year. Obviously, one can always order the standard Bronco one and modify it themself. My understanding from them is its more than the 6x135mm bolt pattern that needs to be modified to make it work and there will be some trial and error if you are doing it yourself.
 
It was a great trip, the pictures don’t even begin to do justice to the fun driving.

uogrades? the one thing that I think needs to be addressed that is the culmination of two Raptor weak points (limited range and tailgate flex) is some way to carry more gas without stressing the tailgate.

I ended up with a small dent (actually two in the same place) from flex in the strap on rotopax carrier and/or the tire carrier In the upper tailgate where the Rotopax corner made contact. Probably occurred on one of a couple “less than smooth transitions” into or out of bumps at speed. A bummer, but totally worth it based on the smile meter.

’I knew my Rotopax carrier was a temporary measure, but I can’t decide on whether to get a roofrack (likely Trail Rax with Pax Rax) or a rear bumper with tire and roto mounts.

I don’t really want the rack as I (currently) plan to take the top off regularly in California despite all the utility a rack brings. But I’m afraid long term the tailgate will remain an issue so that may be a future upgrade.

but not sure anyone makes a Bronco Raptor tire carrier solution due to the 6x135 bolt pattern. Haven’t really looked much though.
I think the answer to the tailgate issues is going to be an aftermarket bumper with a tire carrier. Here is a couple that fit the standard Bronco that I found.
I spoke to Expedition 1, their current Bronco offering does not fit the Bronco Raptor. They are aware that many Bronco Raptor owners are interested, but don't plan to offer Bronco Raptor fitment until next year. Obviously, one can always order the standard Bronco one and modify it themself. My understanding from them is its more than the 6x135mm bolt pattern that needs to be modified to make it work and there will be some trial and error if you are doing it yourself.
I like Metal Tech 4x4 solution with the rear bumper spare tire swing and fuel can holders, currently a Bronco offering. When @Metal-tech 4x4 gets their Bronco Raptor maybe it will be enhanced to a Bronco Raptor offering.

 
  • Like
Reactions: SBP
My Bronco Raptor brake project is completed and it's finally off the jacks. The Calipers show more than before but not like on a car where the caliper is closer to the wheel spokes. I changed the OEM brake pads to Powerstop Extreme carbon fiber ceramic for towing and off-road. It should reduce brake dust and offers a firmer brake pedal, but I'm really not sure if they actually help stop any quicker. I went with these "extreme" model pads as I have them on my Superduty and really like them and I have not noticed any brake fade due to transferred heat back through the pads to the caliper pistons, which boils the brake fluid quicker like other ceramic pads.
Used 2022 Ford F-150 Raptor to find the correct pads.
Part No. Z36-2382 - Front
Part No. Z36-2383 - Rear
083A4971-4EB4-4E9A-B81B-64C6C1C64418.jpeg
 
Looks nice, might have to consider those. But now I’m wondering where those sill guards came from…look good.
Thank you, and page 2 of this thread and the link below will take you directly to the post.
 
  • Thread Starter
  • Thread starter
  • #378
I like Metal Tech 4x4 solution with the rear bumper spare tire swing and fuel can holders, currently a Bronco offering. When @Metal-tech 4x4 gets their Bronco Raptor maybe it will be enhanced to a Bronco Raptor offering.


That looks like a great solution! Hopefully, they get their BR soon.
 
  • Thread Starter
  • Thread starter
  • #379
My Bronco Raptor brake project is completed and it's finally off the jacks. The Calipers show more than before but not like on a car where the caliper is closer to the wheel spokes. I changed the OEM brake pads to Powerstop Extreme carbon fiber ceramic for towing and off-road. It should reduce brake dust and offers a firmer brake pedal, but I'm really not sure if they actually help stop any quicker. I went with these "extreme" model pads as I have them on my Superduty and really like them and I have not noticed any brake fade due to transferred heat back through the pads to the caliper pistons, which boils the brake fluid quicker like other ceramic pads.
Used 2022 Ford F-150 Raptor to find the correct pads.
Part No. Z36-2382 - Front
Part No. Z36-2383 - Rear
View attachment 7473
That turned out great! They pop more than I thought they would through the spokes.
 
I have the half TRMR (only over the back part of the top) - as I’m getting the front Bestop over the front section. I will say that having the PakRax as a standalone, removal of the top would still be easy. You would remove 8 hex bolts from the bottom of the PakRax and then they would just come off with the rear hardtop section. The bottom brackets bolt on between the hardtop and vehicle and would not impact top removal (and aren’t too big and probably would not look bad). Same if you have the half TRMR (I’ll do this if I decide to go topless from time to time). I’ll go grab some pictures up close of all the mounting hardware and post them shortly…
Here are some close up pics…
 

Attachments

  • F9A216C8-BFAD-4F8F-BA6A-8426739D9EFF.jpeg
    F9A216C8-BFAD-4F8F-BA6A-8426739D9EFF.jpeg
    187.7 KB · Views: 58
  • 92A82A7E-4F6B-4BEE-896C-3A7A05279F25.jpeg
    92A82A7E-4F6B-4BEE-896C-3A7A05279F25.jpeg
    348.4 KB · Views: 61
  • ABF69FFC-0B5A-4312-9140-88861EDD45EE.jpeg
    ABF69FFC-0B5A-4312-9140-88861EDD45EE.jpeg
    267.1 KB · Views: 59
  • DBB77989-6D02-4DAC-A511-92D44AE509CA.jpeg
    DBB77989-6D02-4DAC-A511-92D44AE509CA.jpeg
    90.3 KB · Views: 61
  • 3AC92A40-9C63-4D25-B00F-61D34001FC41.jpeg
    3AC92A40-9C63-4D25-B00F-61D34001FC41.jpeg
    109.1 KB · Views: 61
  • C1A83E22-0653-4491-A885-5CA7034B4637.jpeg
    C1A83E22-0653-4491-A885-5CA7034B4637.jpeg
    302.7 KB · Views: 58
Back
Top