What did you do to your Bronco Raptor today?

Going in tomorrow: Desert Does It Seat Jackers for driver & passenger front seats.

View attachment 7106
Got these installed yesterday, pretty straightforward. They essentially add 3/4 inch to the front seat posts when you use both shims (3 deg added seat angle). Who knew that 3/4" would make so much difference (insert jokes here), but you can really feel like you're sitting IN the seat more as opposed ON the seat.

The design has been simplified from the original in that it no longer uses a screw to hold the 2 pieces together but rather uses indents to align with the single 15mm M10 1.5 x 40mm bolt to replace the factory 13mm. The biggest challenge I had was getting the alignment pins from the seat to get back into the alignment hole as the drivers seat slid a little when I pulled it back. As you can see from the pics below this is simply a matter of popping those trim pieces and removing the bolts. The only 'downside' I see is the surrounding trim no longer sits flush with the floor carpet as there's now an additional 3/4in spacer in there. BUt it's something that you have to look for to notice...or a potential landing spot for coins and french fries.


1680097679786.png


1680097705896.png


In all shouldn't take more than 30 min:
  • Adjust seat all the way forward
  • Back out the rear bolts ~ 1/2 way
  • Adjust seat all the way rearward
  • Remove trim covers
  • Remove 13mm front bolts
  • Tilt seat rearward
  • Insert shims under the seat rail
  • Tilt seat back in place; inserting alignment pins
  • Install/tighten 15mm bolt (reuse factory bolt if only using 1 shim)
  • Replace trim covers
  • Adjust seat all the way forward
  • Tighten rear 13mm bolts
  • Adjust seat where you want it
  • Done
I'm driving it up to Northwest OHV Park about 90min outside of Dallas this weekend for some fun, so will see how it helps on a longer drive.
 
Got these installed yesterday, pretty straightforward. They essentially add 3/4 inch to the front seat posts when you use both shims (3 deg added seat angle). Who knew that 3/4" would make so much difference (insert jokes here), but you can really feel like you're sitting IN the seat more as opposed ON the seat.

The design has been simplified from the original in that it no longer uses a screw to hold the 2 pieces together but rather uses indents to align with the single 15mm M10 1.5 x 40mm bolt to replace the factory 13mm. The biggest challenge I had was getting the alignment pins from the seat to get back into the alignment hole as the drivers seat slid a little when I pulled it back. As you can see from the pics below this is simply a matter of popping those trim pieces and removing the bolts. The only 'downside' I see is the surrounding trim no longer sits flush with the floor carpet as there's now an additional 3/4in spacer in there. BUt it's something that you have to look for to notice...or a potential landing spot for coins and french fries.


View attachment 7137

View attachment 7138

In all shouldn't take more than 30 min:
  • Adjust seat all the way forward
  • Back out the rear bolts ~ 1/2 way
  • Adjust seat all the way rearward
  • Remove trim covers
  • Remove 13mm front bolts
  • Tilt seat rearward
  • Insert shims under the seat rail
  • Tilt seat back in place; inserting alignment pins
  • Install/tighten 15mm bolt (reuse factory bolt if only using 1 shim)
  • Replace trim covers
  • Adjust seat all the way forward
  • Tighten rear 13mm bolts
  • Adjust seat where you want it
  • Done
I'm driving it up to Northwest OHV Park about 90min outside of Dallas this weekend for some fun, so will see how it helps on a longer drive.
I need these for my Wrangler where I don't have power seats, hadn't considered this on the Bronco Raptor where I have power seats. Please keep us updated on your ride comfort improvement.
 
Got these installed yesterday, pretty straightforward. They essentially add 3/4 inch to the front seat posts when you use both shims (3 deg added seat angle). Who knew that 3/4" would make so much difference (insert jokes here), but you can really feel like you're sitting IN the seat more as opposed ON the seat.

The design has been simplified from the original in that it no longer uses a screw to hold the 2 pieces together but rather uses indents to align with the single 15mm M10 1.5 x 40mm bolt to replace the factory 13mm. The biggest challenge I had was getting the alignment pins from the seat to get back into the alignment hole as the drivers seat slid a little when I pulled it back. As you can see from the pics below this is simply a matter of popping those trim pieces and removing the bolts. The only 'downside' I see is the surrounding trim no longer sits flush with the floor carpet as there's now an additional 3/4in spacer in there. BUt it's something that you have to look for to notice...or a potential landing spot for coins and french fries.


View attachment 7137

View attachment 7138

In all shouldn't take more than 30 min:
  • Adjust seat all the way forward
  • Back out the rear bolts ~ 1/2 way
  • Adjust seat all the way rearward
  • Remove trim covers
  • Remove 13mm front bolts
  • Tilt seat rearward
  • Insert shims under the seat rail
  • Tilt seat back in place; inserting alignment pins
  • Install/tighten 15mm bolt (reuse factory bolt if only using 1 shim)
  • Replace trim covers
  • Adjust seat all the way forward
  • Tighten rear 13mm bolts
  • Adjust seat where you want it
  • Done
I'm driving it up to Northwest OHV Park about 90min outside of Dallas this weekend for some fun, so will see how it helps on a longer drive.
I’m waiting on my work schedule for Sunday, but I’m hoping to make it up there as well! I’d love to see all the cool stuff you’ve added to your Bronco!
 
I need these for my Wrangler where I don't have power seats, hadn't considered this on the Bronco Raptor where I have power seats. Please keep us updated on your ride comfort improvement.
Wranglers DEFINITELY need these...along with another 3-4 inches of legroom and 1-2 inches headroom.

As for the Raptor the seating is already a pretty major upgrade over non-Raptors and felt pretty good to begin with so this is just icing on the cake.
 
Wranglers DEFINITELY need these...along with another 3-4 inches of legroom and 1-2 inches headroom.

As for the Raptor the seating is already a pretty major upgrade over non-Raptors and felt pretty good to begin with so this is just icing on the cake.
Just ordered them for my Wrangler, I will probably also be ordering for the Bronco Raptor based on your feedback post trip.
 
Wranglers DEFINITELY need these...along with another 3-4 inches of legroom and 1-2 inches headroom.

As for the Raptor the seating is already a pretty major upgrade over non-Raptors and felt pretty good to begin with so this is just icing on the cake.
So I’m a tall fella (6’ 4”) and am always looking for more comfort. What exactly do these little guys do and how does it improve the seating position?
 
Thank you, I will remove the casting risers, polish it out, then have it powder coated and use new SS hardware like I did with my OEM superduty aluminum diff cover. I could have modified the one on there, however I hate the gear lube odor and prefer a quick swap.
View attachment 7100
Everything just looks amazing!
 
So I’m a tall fella (6’ 4”) and am always looking for more comfort. What exactly do these little guys do and how does it improve the seating position?

I'm 6'0" and have had back issues for years...so raising my legs a bit gives me a better angle. It also seems like the seat envelops me a little better (sit in the seat instead of on it). I noticed my feet now sit a little flatter on the floorboard as opposed to heel (esp left foot).
 
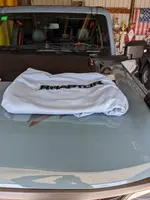
where'd you get that decal?
And nice work on the license plate!
Given that your sig suggests you have a 350R, perhaps you'll appreciate my plate ;-)...and let's hear some deets on the R.View attachment 7166
The raptor decal is from https://www.vinylsometimes.com its the carbon fiber one.

Thats a good plate for the 350👍🏻 I have a 20 heritage 350r that i got lucky finding in Tx.
 

Attachments

  • 95BK9 (5).jpeg
    95BK9 (5).jpeg
    108.9 KB · Views: 54
  • 95BK9 (4).jpeg
    95BK9 (4).jpeg
    310.2 KB · Views: 54
  • 95BK9 (3).jpeg
    95BK9 (3).jpeg
    139.9 KB · Views: 56
Did you get a little mud on the tires?
 
The MD plate plates your Braptor color.
 
Last edited:

Top Member Reactions

Back
Top